Showing posts with label recipe. Show all posts

Friday, June 24, 2011

Anti-recipe: Mexican pizza


I'm always on the lookout for quick, flexible, inexpensive meals, and I thought I'd show you one here. This is inspired by the Mexican pizzas I remember getting as a kid at Taco Bell (+1 to fat American stereotype), though you can make it into whatever you want.

You'll need a starch, some veggies, and at least one source of protein.

For this example, I used:
  • two tortillas as my starch
  • avocado and salsa as my veggies
  • refried beans, cheese, tuna and chili as protein sources
(cheese not pictured, whoops!)

The first thing you'll want to do is toast your tortillas lightly so they're golden brown and just a little crunchy. I stuck mine in the toaster oven until they looked like this:
While your other tortilla is toasting, smear some refried beans on the first one and sprinkle some shredded cheese on top. Be careful to keep an eye on the one in the toaster oven though, so you don't end up with this:

Multitasking fail

Once the second one is toasted, put it on top of the refried bean layer, add some chili, a little bit of tuna, and whatever seasonings you like.

Microwave for about a minute while you slice up some avocado to put on top.

Once the cheese is melty and everything is warm, add the avocado, slice into pieces, and enjoy!
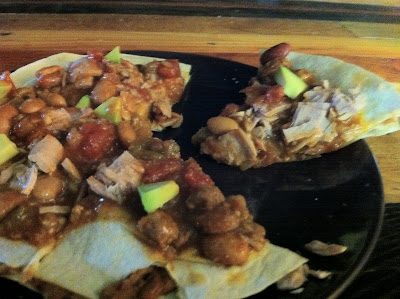
I was pleasantly surprised with how well this turned out this time. Lots of beans, tuna, and not a lot of fresh veggies, but it still tasted good, was very filling, and the tuna didn't make it taste too fishy.

I would have preferred to have some lettuce and fresh diced tomatoes and cilantro, but I've made some... dubious choices with my food budget this month, so I'm just working out of what's in my pantry. Just remember to think about what you should be put on after microwaving (i.e. lettuce)

Also, if you feel like mixing up the starch used, you could do a layered rice bowl or create a neat sandwich. There are tons of possibilities, that's part of the fun of this anti-recipe :)


Friday, June 10, 2011

Nostalgia Cookies


Well, okay, that's not actually their name. But with these as a staple at all the family holiday gatherings and the sense of happiness just the smell of them baking brings me, they could just as easily go by the other name.

These cookies are dense and chocolatey without being overly rich, and are delicious whether they're covered in festive sprinkles or dunked in a morning cup of tea. The recipe itself is quite simple, and the only real time investment is letting the dough chill for a bit and, until you get the hang of it, rolling them out into pretzels.

Mom's Chocolate Pretzel Recipe
Makes 24 large pretzels or 36 small pretzels
2 1/2 cups flour
1/2 cup cocoa
1/2 teaspoon salt
1 cup softened butter
1 cup sugar
1 egg at room temperature
1 1/2 teaspoon vanilla

In a small bowl, combine the flour, cocoa and salt.
In a medium bowl, beat together the butter and sugar, then beat in the egg and vanilla.
In 3 additions, beat in flour mixture.
Divide into 2 logs, wrap with plastic wrap and refrigerate for at least 1-2 hours, or overnight.

When ready to shape the logs, take them out of the fridge (If chilled overnight, allow 10-15 minutes for them to thaw slightly) and set the oven to 350 F
Divide both into 12 or 18 pieces depending on how large you'd like the cookies to be.
Choose one log to work with first, and return the other to the fridge.
Shape each pretzel one at a time: gently roll out a piece into a 6-8 inch snake.

Take one end and bend it over toward the middle.
Repeat with other side, and allow the two ends to cross over each other.
You're welcome to stop here, but if you'd like yours to look a little fancier, twist the two ends over each other 1-2 more times.

And then position them so the bottom of the twisted ends is at the bottom of the pretzel, like so:

After each pretzel is shaped, place it on a baking sheet. Shape the remaining pretzels and place them on the baking sheet, leaving a couple of inches between each one. Repeat with the other log that was in the fridge.
Bake for 10 minutes, or until set.
Enjoy with a glass of milk :)


Wednesday, June 8, 2011

Crema

So, I don't have a recipe for my story but I don't really think it would be that hard to figure out. One of my favourite desserts is crema (I know that looks like I've spelt it wrong but it's right, I even double checked with my mum) and it's food with a lot of sentimental value for me. Crema is basically an Italian dessert, although not all of the ingredients are Italian, all it really is, is sponge fingers soaked in whisky and covered in homemade custard.

It's been a tradition for as long as I can remember that we would have crema for dessert on Christmas, it's one of the things I look forward to the most on Christmas day. I usually always have seconds of it. At Christmas it's my dad that makes it, he's not very good a getting the custard right but I still really like it.

I think it was for my Birthday last year my nonna made me a huge dish of it. My nonna makes the best crema. I shared some of this huge dish with my mum and my brother and ate the rest myself. Since it was my eighteenth, I had had some champagne too, and I should point out that when my nonna makes crema she really soaks the sponge fingers in whisky, like really soaks them, so I ate about half of the dish of crema. As you can probably tell from where I'm going with this, I was drunk because of the amount of alcohol in it, it was rather funny.

Anyway if I get hold of the recipe for this I will add it to this post.

Tuesday, June 7, 2011

Garlic Fingers?!

The recipe I want to share is for garlic fingers.  Since they're a food that doesn't really exist outside of Atlantic Canada, I feel like I should give a quick explanation first.  They're basically pizza dough topped with garlic butter and mozzarella cheese, and sometimes bacon or other things.  Their regional nature is part of the reason I thought it would be fun to share this recipe.

In addition to being delicious, garlic fingers are also a food with special sentimental significance to me.  During my first year of university I was having a potluck dinner with a big group of my friends.  We actually have this potluck every year now, and it's known as the Annual Christmas Miracle Potluck.  But this was the first year, when we didn't know it was a miracle yet and it was only associated with Christmas in that they both took place in December.  At the time it was just a potluck, but it was the first one, and it was special and magical and it's the one that all the ones we have had since have failed to leave up to.  Because we all lived in residence, we couldn't make any fancy dishes, so we went to the grocery store together and everyone bought $5 worth of food.  Then we went back to campus to cook it up in the kitchenette and eat it in one of the common rooms.  It was the most ridiculous meal ever.  I don't remember what all we had, but one person had bought about 12 packages of Mr. Noodles, and then there was a block of cheese and a loaf of bread and a small cake and a bunch of other stuff.  But the very last thing to come out of the kitchen was garlic fingers (you can buy pre-made frozen ones at the store the same way you can with pizzas).  Most of us didn't realize that they were there, so we were completely surprised when the person who had bought them brought them out to the table, and we all said "Garlic fingers?!" So now it's an in-joke of ours that whenever we're surprised and exclaiming about something, we just start going "garlic fingers?!" all the time.

This recipe is one that my roommate and I found online somewhere last summer when we had a garlic fingers craving, and wondered if we could make them ourselves instead of having to buy them.  We were so pleased with how well they turned out!  They taste surprising close to the ones you could get at a pizza place.

Garlic Fingers


Make pizza dough according to your favourite pizza dough recipe (Or buy it).  I can't find my pizza dough recipe just now, otherwise I would share it, too.  Spread on pan.

Garlic butter:

1 c. butter, softened
1 tbsp. minced garlic (2-3 cloves)
1/4 c. parmesan cheese
1 tbsp. garlic salt
1 tsp. italian seasoning
1/2 tsp. black pepper
1/4 tsp. paprika

Melt butter in a small saucepan over low heat.  Stir in the rest of the ingredients.  When thoroughly mixed, remove from heat.  Spread enough butter on pizza dough to cover it (usually about half of the recipe).  Pour the remainder into a jar to save it for later!  It's also good on toast and pasta.

Spread grated mozzarella cheese over the dough.  Just enough to cover it in a single layer - if you use too much cheese it overwhelms the garlic taste.  Optional - sprinkle with bacon bits (or small pieces of freshly-cooked bacon).

Cook at 425F for 15 minutes, or until cheese is melted and crust is browned.